5.20241.9
5.20241.9
ツリービュー:スタイル
CSSを使用してTreeViewの外観をカスタマイズできます。次の例は、2種類のカスタマイズを示しています。
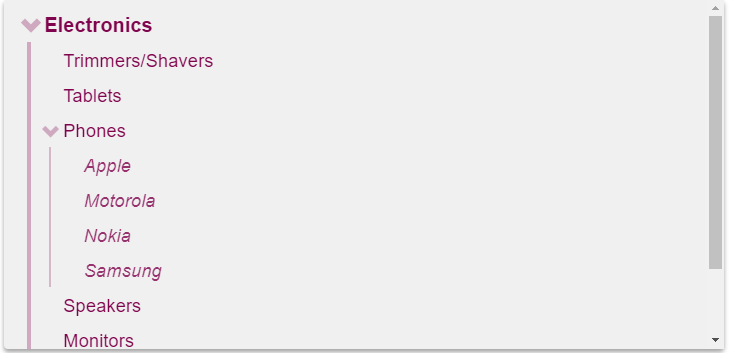
例1:折りたたみ/展開アイコンを変更し、ノードレベルに応じて異なるフォントサイズを使用して、レベル1のノードの左側に縦棒を追加します。
CSS
.custom-tree.wj-treeview {
    color: #80044d;
}

/* デフォルトのノード */
.custom-tree.wj-treeview .wj-node {
}

/* レベル0以下のノード */
.custom-tree.wj-treeview .wj-nodelist > .wj-node {
    font-size: 120%;
    font-weight: bold;
}

/* レベル1以下のノード(小さなフォントに変更し、左側に縦棒を追加) */
.custom-tree.wj-treeview .wj-nodelist > .wj-nodelist > .wj-node,
.custom-tree.wj-treeview .wj-nodelist > .wj-nodelist > .wj-nodelist {
    font-size: 110%;
    font-weight: normal;
    border-left: 4px solid rgba(128, 4, 77, 0.3);
}

/* レベル2以下のノード(小さなフォントに変更し、境界線を細くする) */
.custom-tree.wj-treeview .wj-nodelist > .wj-nodelist > .wj-nodelist > .wj-node, .custom-tree.wj-treeview .wj-nodelist > .wj-nodelist > .wj-nodelist > .wj-nodelist {
    font-size: 100%;
    font-style: italic;
    opacity: 0.8;
    border-left: 2px solid rgba(128, 4, 77, 0.3);
}

/* 展開されたノードのグリフ */
.custom-tree.wj-treeview .wj-nodelist .wj-node:before {
    content: "\e114";
    font-family: 'Glyphicons Halflings';
    top: 4px;
    border: none;
    opacity: .3;
    transition: all .3s cubic-bezier(.4,0,.2,1);
}

/* 折りたたまれたノードのグリフ */
.custom-tree.wj-treeview .wj-nodelist .wj-node.wj-state-collapsed:before, .custom-tree.wj-treeview .wj-nodelist .wj-node.wj-state-collapsing:before {
    transform: rotate(-180deg);
    transition: all .3s cubic-bezier(.4,0,.2,1);
}

/* 選択されたノード */
.custom-tree.wj-treeview .wj-node.wj-state-selected {
    color: white;
    background: rgba(128, 4, 77, 0.70);
}

/* このサンプルのデフォルトツリー */
.wj-treeview {
    display:block;
    height: 350px;
    font-size: 120%;
    margin-bottom: 8px;
    padding: 6px;
    background: #f0f0f0;
    box-shadow: 0 3px 6px rgba(0,0,0,0.16), 0 3px 6px rgba(0,0,0,0.23);
}
body {
    margin-bottom: 24pt;
}
HTML
<div id="theTree" class="custom-tree"></div>
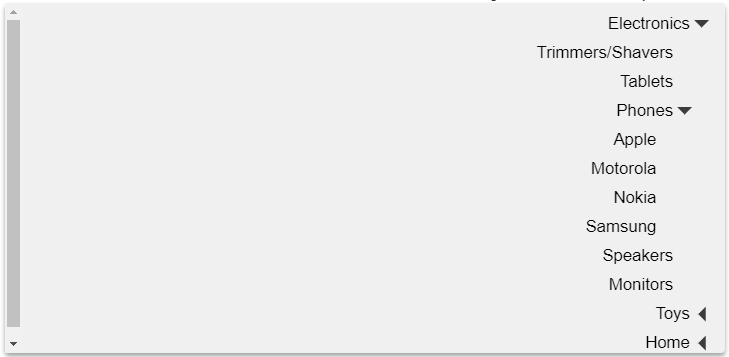
例2:ツリーノードに下境界線を追加します。境界線をツリーの左側まで延長するには、CSSで境界線と共にpadding-leftプロパティとmargin-leftプロパティを設定します。

CSS
.custom-tree.wj-treeview .wj-node {
    border-bottom: 1px solid #a0a0a0;
    padding-left: 110px;
    margin-left: -100px;
    margin-right: -10px;
}

.wj-treeview {
    width: 300px;
    height: 350px;
    font-size: 120%;
    margin-top: 8px;
    margin-bottom: 8px;
    padding: 6px;
    background: #f0f0f0;
    box-shadow: 0 3px 6px rgba(0,0,0,0.16), 0 3px 6px rgba(0,0,0,0.23);
}
body {
    margin-bottom: 24pt;
}
HTML
<div id="theTree" class="custom-tree"></div>
右から左
ページの右から左にコンテンツをレンダリングする言語もあります(典型的な例はアラビア語とヘブライ語)。HTMLは、「dir」属性を使用してこれに適応しています。任意の要素で「dir」を「rtl」に設定すると、要素のコンテンツが右から左に配置されます。
TreeViewコントロールは、これを自動的にサポートします。ツリーをホストしている要素の「dir」属性を「rtl」に設定すると、ノードが右から左に向かって自動的にレンダリングされます。
HTML
<div id="content" dir="rtl">
    <div>
        これは<b>TreeView</b>の前に置かれた通常のコンテンツです。
    </div>
    <div id="theTree"></div>
</div>